Contents
Mouse Wheel Functions – Adjust rows and columns
Create a Screen Snapshot as HTML
Create a Screen Snapshot Image
View a Summary of Tame Settings
Review Actions of a DOS session
Tame GUI Console
Tame includes an advanced console to replace the DOS console of Windows. With the Tame console, DOS users will enjoy many of the benefits previously available only when running native Windows applications. Here is a partial list of GUI enhancements that are immediately available with most DOS applications.
Click here to see more features that that are available in the Tame console.
Customizing the Console
Tame can be customized for optimal use with your application. Some of the available capabilities are listed below. Some of the options are easily set up by an end user, or may be centrally defined for use by all users of the application. See the Application Integration Guide for more information.
Using the Keyboard and Mouse
The following keys may be used in order to control the Tame console. Note that the system administrator may configure these keys to pass through to the DOS application.
|
Keyboard |
Result |
|
Alt+Enter |
Toggle full screen mode. If enabled, the hardware full screen mode will be used. Otherwise, the Tame textfull screen window will be displayed. |
|
Winkey+Enter |
Toggle full screen mode |
|
Winkey+Left Winkey+Right |
Begin marking text. When the text has been marked, pressing ENTER will copy to the Windows clipboard. Note that some video card drivers will intercept this key by default. When that is done, Tame cannot process the key. |
|
Winkey+F4 |
Exit the application (if alt-F4 to exit is enabled) |
|
Winkey+S |
Toggle the status line |
|
Winkey+/ |
Refresh the console screen |
|
Winkey+S |
Toggle the status line |
|
Pause |
If a paste is in progress, the Pause key will pause the paste. Press Pause again to resume. The ESC key will terminate a paste that is in progress. |
|
Winkey+0 Winkey+1 Winkey+2 … Winkey+9 |
Winkey plus a number will set the line spacing to that number of screen pixels. The default line spacing is 2 pixels. |
The following keys may be defined by editing the application configuration file. By default, these keystrokes are passed to the application.
|
Keyboard |
Result |
|
Ctrl-C |
Copy marked text to the clipboard. If no text is marked, Tame will select text near the cursor, but not copy to the clipboard yet. If the automatic text selection is satisfactory, press Ctrl-C again to copy. |
|
Ctrl-V |
Send clipboard text to the application by simulating keystrokes that would be used to enter the text manually. If Unicode clipboard is enabled and the text is available in Unicode format, the text will be converted to DOS-compatible text using the active codepage. |
|
Shift+Left Shift+Right |
Begin marking text. When the text has been marked, pressing ENTER will copy to the Windows clipboard. This is enabled when the “Quick Key Mark” option is selected. |
|
Winkey+F4 |
Exit the application (if alt-F4 to exit is enabled with /View WinKeys=+AltF4) |
Mouse Functions
By default, Tame will use or share the mouse, depending on whether the app is using the mouse. The following mouse actions
|
Mouse Action |
Result |
|
Right Click (Ctrl+Right Click) |
Show the Tame context menu. If the mouse is enabled for DOS usage, the Ctrl key must be pressed. |
|
Double Click (Ctrl+Double Click) |
Select text near the point of double click. If the mouse is enabled for DOS usage, the Ctrl key must be pressed. |
|
Drag Screen (Ctrl+Drag Screen) |
Press the button in the screen area and drag the mouse across the screen in order to mark text. This function is enabled when “Quick Mouse Mark” is enabled. |
|
Mouse Wheel |
The mouse wheel will normally scroll up and down. The exact result is application dependent, and may be configured for each application. |
|
Ctrl+Wheel |
Change the window size. This will normally Increase/decrease text size to fit the new window size. |
|
Shift+Wheel |
Change window height - Increase or decrease text spacing between lines, or add rows if the app supports dynamic rows. |
|
Alt+Wheel |
Change window width – Increase or decrease text spacing between columns, or add/remove columns if the app supports dynamic rows |
|
Window Resize |
Resizing the window will normally increase or decrease text size to fill the window. However, if the option to “Keep Text Size” is enabled, text size will remain the same. If the application is configured for dynamic screen size, row and/or column counts can change. Otherwise, inter-character spacing is adjusted so that existing text fits in the resized window. |
|
Drop a file |
If a file is dragged from explorer and dropped on the Tame console, the resulting action depends on the type of file dropped and how Tame is configured. Some options that may be configured include to paste the file name, paste the file contents (txt files only), or apply the file as Tame settings. When pasting the file name, you have a choice to paste the long windows path, or the abbreviated DOS-compatible (AKA 8.3) path. |
|
Drop Multiple Files |
When multiple file are dropped into the window, the list of path names is pasted. |
Mouse Wheel Functions – Adjust rows and columns
The following wheel actions are available with applications that support variable rows and columns. These functions replace the default actions while the option top resize row/column layout is enabled.
|
Mouse Action |
Result |
|
Shift+Wheel |
Change console height, and add or remove rows as needed to fill the window. |
|
Alt+Wheel |
Change the width of the console, and add or remove rows as needed to fill the window. |
|
Shift+Alt+Wheel Ctrl+Wheel |
Combines Shift and Alt functions to adjust rows and columns at the same time. |
|
Shift+Ctrl+Wheel |
Resize text in the window, but do not change the window size. Rows and columns will be adjusted to fit, |
Using the System Menu
The system menu provides easy access to configure user preferences, view status and perform diagnostics. User preferences that are changed using the menu may be saved automatically when the app exits, and re-applied the next time the same shortcut is used.
The system menu of the Tame Console can remain open after an item has been selected, allowing efficient selection of multiple items, or, efficient preview for options that change the display.
To select an item without closing the menu, use the spacebar or a right-click with the mouse.
Using the Context Menu
To display a context menu, Ctrl-Right click on the screen. The contents of the menu will depend on what is happening at the time.
If you choose to mark text, Tame will check examine the area around the mouse press, and mark text in the area. If that text is what is needed, simply copy to place it in the clipboard. Or, use the mouse to mark a different area.
If a long paste is in progress, the context menu will provide the option to cancel or pause the paste operation.
Common Actions
Change the Primary Font
The primary text font may be set using Select View/ Font Menu. Press ”apply” to preview without closing the font dialog.
Note that other fonts may be in use. Those fonts may be changed by updating the configuration file.
Change Colors
Default colors may be redefined. Each of the 16 DOS colors may be separately defined for foreground and background usage. In addition, each combination of foreground and background color may be assigned to display with a specific font, and/or a unique foreground and background color.
For example, a blue background may be darkened without changing the blue foreground color, and text that normally displays as yellow on blue may be displayed as bold red text on a white background using a different font.
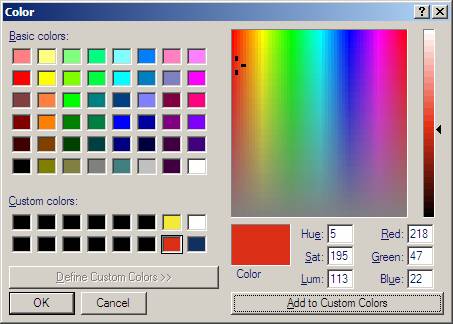
To change colors based on text, Right click on text (or ctrl-right click if the mouse is active with the application), and select “Color Change”. A standard Windows color dialog will be displayed, but only two colors will be shown. The following dialog will be displayed for white text with a blue background.
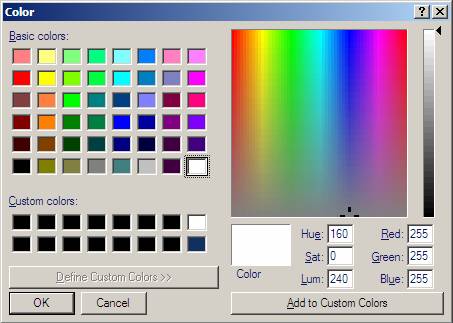
This dialog may be used to change the background blue or foreground white color. Click on the color to change, and select a color using the tool on the right side. When done, select “Add to Custom Colors” and then OK.
This dialog may also be used to change the color to be used for white on blue, without affecting other white text or other text with a blue background. To do this, select the box immediately to the left of the foreground and background color. The following will substitute yellow on red.
Change Settings
The “Default Options” system menu item allows viewing or changing Tame settings files. Using the menu, select a file to edit. The default file will contain comments with general instructions. Changes to the file will take effect next time the application is run. Or, select “Re-Load All Settings Now” to apply settings. See theTame Administrator Guide for additional information.
Program Keyboard
MacroDefine
The /MacroDefine option defines an action to perform when a specific event occurs. The following events may be processed.
|
Event Option |
Result |
|
OnKey=<key>
|
Define action when the specified key is pressed. See the list of valid key names below. Note that key modifiers (e.g. Shift) may be specified. |
|
OnAppCommand=<cmd> |
Define action when the specified Windows “App Command” occurs. This includes commands such as Close, Paste, etc. See the list of valid command names below. |
|
OnAppEvent=<name> |
Define action when the specified named event is signaled. App Events may be signaled using Sendinput. |
|
OnDropFiles=<ext> |
Define an action that will process when a file of the specified file extension is dropped using drag/drop. This is normally a Sendinput, specifying keystrokes that will import the file into the application. Environment values are set to allow access to the file path. %TameDropPath% contains the long file name and %TameDropDosPath% is the abbreviated DOS-compatible file name. |
|
OnDropFiles=* |
Specify a default action to process a dropped file. |
|
OnSystemEvent=<name> |
Define action when the specified system event occurs. These include Logoff, etc. See the list of valid system events below. |
|
OnPowerEvent |
Define action when the specified power event occurs. These include BatteryLow, Suspend, etc. See the list of valid power events below. |
|
AddToMenu=<id> |
Add an item to the system menu. See below for valid menu Ids. |
|
SystemMenu=”Text” |
Add an item to the system menu. Text should be one or more characters representing the short-cut keys needed to reach the menu item. |
|
DisplayName=”title” |
When adding a menu item, the display name may be specified. Prefix the hot key letter with &. E.g. “List &Properties”. Prefix with “_” to add a menu separator line. Prefix with “|” to start a new column. |
SendInput
The /SendInput option may be used to send instructions to the Tame GUI console window. This includes sending keystrokes, signaling events, and changing the window configuration.
|
Send Event Type |
Result |
|
Text=”<text>” |
Specify text to send to the application |
|
ExpandText=”<text>” |
Specify text to send to the application. Embedded environment values will be expanded before sending. E.g. ExpandText=”%UserName%”. Note that some events will set additional environment values allowing access to properties of the event. |
|
Key=<key>.<key> |
Specify one or more keystroke names. E.g. Key=AltF10 |
|
BiosScan=<code> |
Specify the BIOS scan code of the key to send. E.g. #011C |
|
TextFile=<path> |
Send the entire contents of the specified file as input to the app. |
|
VirtualKey=<code> |
Specify the Windows virtual key code. Must be a number between 1 and 255 |
|
VirtualKeyDown=<code> |
Press the specified key but do not release the key. Should be followed by VirtualKeyUp at some point. |
|
VirtualKeyUp=<code> |
Release the specified key if it is currently pressed. |
|
StatusBarMessage= |
Specify text to show on the status bar |
|
AppCommand=<cmd> |
Specify an App Command to send to the application. This includes commands such as Close, Paste, etc. See the list of valid command names below. |
|
Notify=<name> |
Execute an app event that has been defined using /MacroDefine OnAppEvent=<name> |
|
QueueExecMacro |
Execute the specified macro. Select the macro using options for MacroDefine (e.g. QueueExecMacro OnAppEvent=Paste) |
|
SetCapsLock=<bool> |
Set caps lock status off or on |
|
SetInsertLock=<bool> |
|
|
SetScrollLock=<bool> |
|
|
SetNumberLock=<bool> |
|
|
Gui Action |
Result |
|
MenuShow=<id> |
Display the specified system menu. See below for valid menu Ids. |
|
MenuExecute=<text> |
Execute an item on the system menu. Text should be one or more characters representing the short-cut keys needed to reach the menu item. |
|
ExecCtxMenuItem |
Execute an item on the context menu. Text should be one or more characters representing the short-cut keys needed to reach the menu item. Each character separated by a space. E.g. “D V” to view current settings. Or, menu search text separated with comma (e.g. “Default,View” |
|
ShowWindow=<stat> |
Change the window status. Options are single letter – ‘F’ = full, ‘W’=Window, ‘X’=Maximized |
|
FreezeScreen=<bool> |
May be used to stop screen updates during processing. This keeps the screen from jumping around as keys are being processed. Set to T to freeze, F when done to allow screen updates to resume |
|
|
|
|
|
|
|
Action Type |
Result |
|
WaitAppReady |
Wait until the app has completed processing of all keys, and is waiting for input. |
|
Sleep=<ms> |
Delay the specified number of milliseconds. Note if ms is less than 30, it is assumed to be seconds instead. |
|
DelayNextKey |
|
|
OnScreenText=<text> |
Continue sending input only if the specified text is visible on screen |
|
WaitForScreenText=<text> |
Delay until the specified text is visible on the screen |
|
ApplyViewSettings |
Apply pending settings before continuing |
|
|
|
|
|
|
|
|
|
|
|
|
Console Display Triggers
Tame may be configured to take action based on whether or not specific text is contained on the screen. The location of the text may be optionally defined. In addition the location of the text may be relative to the cursor if only text at the current cursor is to be selected. Once found, the following types of actions are available:
- Highlight the text (using a variety of options)
- Highlight the screen field under the cursor
- Set a mode (Insert/overwrite, or busy/idle)
- Execute a Tame string (including send input to the app)
To select text, the following options are available:
|
Match Option |
Result |
|
MatchText |
Specify a text string to match |
|
IgnoreCase |
Specify T to ignore case while matching text (default) or F to force the case to match. |
|
MatchRow |
Specify the screen line/row. The top line is row 0. Rows may also be measured from the bottom of the screen by specifying a negative number. -1 is the bottom row. |
|
MatchCol |
Specify the screen column. The leftmost column is 0. Columns may also be measured from the right side of the screen by specifying a negative number. -1 is the rightmost column. |
|
FromCursorRow |
Specify the screen line/row relative to the cursor. Rows above the cursor are negative. Note that when cursor relative position is specified, search text may be omitted to select whatever text is under the cursor. |
|
FromCursorCol |
Specify the screen column relative to the cursor. Columns left of the cursor are negative. |
|
MatchCursorPos |
Specify T if as a shortcut to specify a match at the both the cursor row and column. |
|
NearCursor |
Specify T if the text near the cursor is to be searched. |
|
MatchAttribute |
Specify the screen atrtribute to match. Value is #BF where B is the background color code and F is the foreground color code (see Color Names) |
|
SkipChars |
Specify one or more additional characters that may be considered part of the selected string when adjacent to it. Normally use for highlighting |
The following options are available to process screen triggers.
|
Match Actions |
Result |
|
Indicates=<option> |
Specify that the text has one of the following meanings: Idle, Busy, Insert, Overwrite |
|
OnShow |
Specify an options string to execute when the text appears (e.g. SendInput ENTER) |
|
OnHide |
Specify an options string to execute when the text disappears |
|
HighlightInvertIntensity |
Specify T to highlight by changing intensity |
|
HighlightReverseVideo |
Specify T to highlight by reversing foreground and background color |
|
HighlightMarkText |
Highlight by marking the text using the text mark function |
|
HighlightForeGroundColor |
Specify the color for foreground. See available Color Names |
|
HighlightBackGroundColor |
Specify the color for background. See available Color Names |
|
HighlightExtend |
Specify T to extend the highlight beyond the match string |
|
SelectField |
Specify T to extend the highlight to the on-screen field |
Examples
If the app displays “* Please wait *" on the bottom row of the screen while working:
/ConsoleWatch
Name="Wait..." MatchText="* Please wait *" MatchRow=-1
ind=busy
If the app displays “READY" on the top left of the screen while waiting for input:
/ConsoleWatch Name="Ready"
MatchText="READY" MatchRow=0 MatchCol=0 ind=idle
To easily bypass an “Are you Sure” prompt:
/ConsoleWatch MatchText="Are You Sure? "
NearCursor=T OnShow=(Sendinput “Y”)
Screen Elements
If the app displays input prompts and fields using consistent attributes, this may be used to more quickly identify when the app is idle.
Prompts are of the form Question? With the cursor after it. Fields are a color coded rectangle containing data that may be entered.
Examples
/ScreenElement id="Prompt (Red)"
MatchAtr=#4F Type=Prompt Row=0 Left=1 MaxHeight=1
/ScreenElement id="Prompt (Green)" MatchAtr=#2E Type=Prompt Row=0
Left=1 MaxHeight=1
/ScreenElement id="Entry Field" MatchAtr=#3F Type=DataEntryField
Advanced Console Operations
Create a Screen Snapshot as HTML
Select Edit / Save Screen Image to a File, and select the HTML file format.
Create a Screen Snapshot Image
Select “Edit”, “Copy Screen Image”
View a Summary of Tame Settings
The summary includes a list of settings that are not using default values. It also lists each settings file in order, and the contents of each file.
Review Actions of a DOS session
Choose “Trace Dos Details to a File” in order to start a diagnostic trace file. The trace file contains a detailed log of activity, as well as user interface items such as keystrokes and screenshots. If you are having problems, the trace file has information TameDos may need in order to determine a course of actions.
The trace file is not just for Diagnostics. It contains a detailed account of the session that may be useful for training purposes, documenting the DOS application, or reviewing a prior run of the app. The trace summary produces an HTML document that accurately represents user interaction if the session. To get a summary select that option from the troubleshooting menu, or, if the app already exited, drag the TDT trace file and drop it on the tameview.exe program.
Reference Tables
Color Names
|
Code |
Color Name |
|
0 |
Black |
|
1 |
Blue |
|
2 |
Green |
|
3 |
Cyan |
|
4 |
Red |
|
5 |
Magenta |
|
6 |
Brown |
|
7 |
Light-Gray |
|
8 |
Gray |
|
9 |
Light-Blue |
|
A |
Light-Green |
|
B |
Light-Cyan |
|
C |
Light-Red |
|
D |
Light-Magenta |
|
E |
Yellow |
|
F |
White |
Key Names
The following list represents valid Key Names. Each Key Name may be prefixed with Win, Alt, Shift or Ctrl if needed. May also be prefixed with Left or Right to specify the exact toggle key. For example: F10, AltF10, RightAltF10
A
...
Z
0
...
9
Up
Down
Left
Right
Insert
Delete
Home
End
Page_Down
Page_Up
NumberPad_Up
NumberPad_Down
NumberPad_Left
NumberPad_Right
NumberPad_Insert
NumberPad_Delete
NumberPad_Home
NumberPad_End
NumberPad_PageDown
NumberPad_PageUp
NumberPad_0
NumberPad_1
NumberPad_2
NumberPad_3
NumberPad_4
NumberPad_5
NumberPad_6
NumberPad_7
NumberPad_8
NumberPad_9
NumberPad_.
NumberPad_Decimal
NumberPad_ADD
NumberPad_SUBtract
NumberPad_MULtiply
NumberPad_DIVide
NumberPad_ENTer
Gray_+
Gray_-
Gray_*
Gray_/
Gray_Enter
F1
F2
F3
F4
F5
F6
F7
F8
F9
F10
F11
F12
F13
F14
F15
F16
F17
F18
F19
F20
F21
F22
F23
F24
PrintScreen
Pause
Break
InsertLock
CapsLock
NumberLock
ScrollLock
Apps
Help
ProcessKey
Oem_Plus
Oem_Comma
Oem_Minus
Oem_Period
Oem_102_Backslash
Oem_1_Semicolon
Oem_2_Question
Oem_3_Tilde
Oem_4_Openbrackets
Oem_5_Pipe
Oem_6_Closebrackets
Oem_7_Quotes
Oem_8
BrowserBack
BrowserForward
BrowserRefresh
BrowserStop
BrowserSearch
BrowserFavorites
BrowserHome
VolumeMute
VolumeDown
VolumeUp
MediaNextTrack
MediaPrevTrack
MediaStop
MediaPlayPause
LaunchMail
LaunchMediaSelect
LaunchApp_1
LaunchApp_2
App Command Names
BrowserBackward
BrowserForward
BrowserRefresh
BrowserStop
BrowserSearch
BrowserFavorites
BrowserHome
VolumeMute
VolumeDown
VolumeUp
MediaNextTrack
MediaPreviousTrack
MediaStop
MediaPlay_Pause
LaunchMail
LaunchMediaSelect
Launch_App1
Launch_App2
BassDown
BassBoost
BassUp
TrebleDown
TrebleUp
MicrophoneVolumeMute
MicrophoneVolumeDown
MicrophoneVolumeUp
Help
Find
New
Open
Close
Save
Undo
Redo
Copy
Cut
Paste
ReplyToMail
ForwardMail
SendMail
SpellCheck
MicOnOffToggle
CorrectionList
MediaPlay
MediaPause
MediaRecord
MediaFastForward
MediaRewind
MediaChannelUp
MediaChannelDown
Power Event Names
BatteryLow Battery power is low.
PowerStatusChange Power status has changed.
QuerySuspend Request for permission to suspend.
QuerySuspendFailed Suspension request denied.
ResumeAutomatic Operation resuming automatically after event.
ResumeCritical Operation resuming after critical suspension.
ResumeSuspend Operation resuming after suspension.
Suspend System is suspending operation
OEM_EVENT OEM-defined event occurred.
Menu ID Numbers
#1 System menu
#11 Edit
#12 View
#13 Help
#14 Default Options
#15 Admin
#1A Application
#1B User
#2 Context menu (Mouse Right Click)